
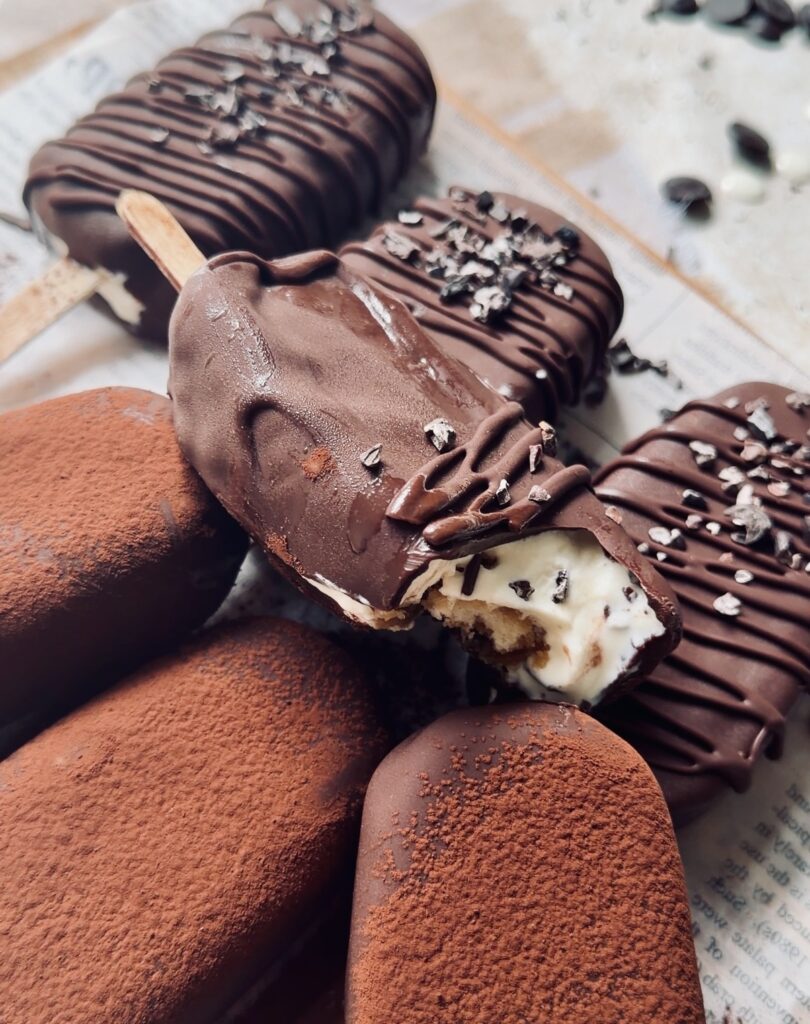
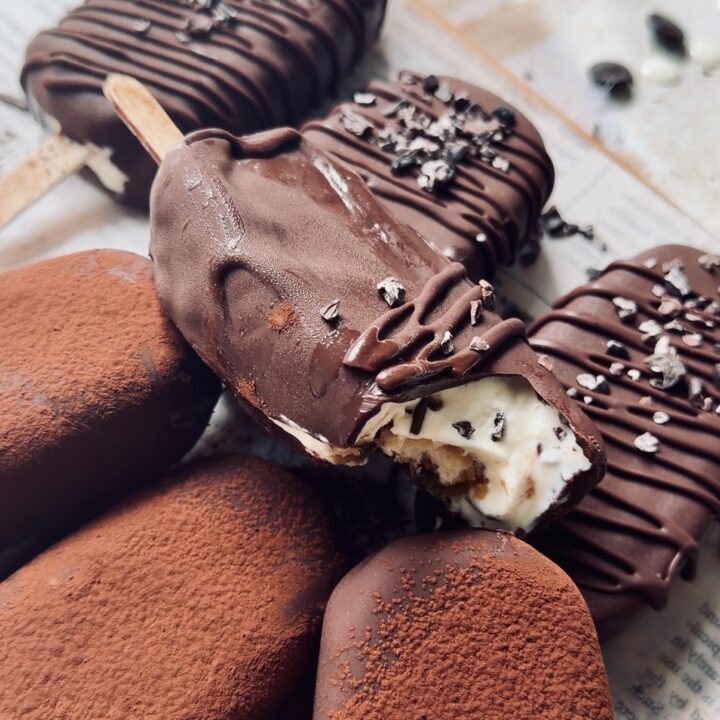
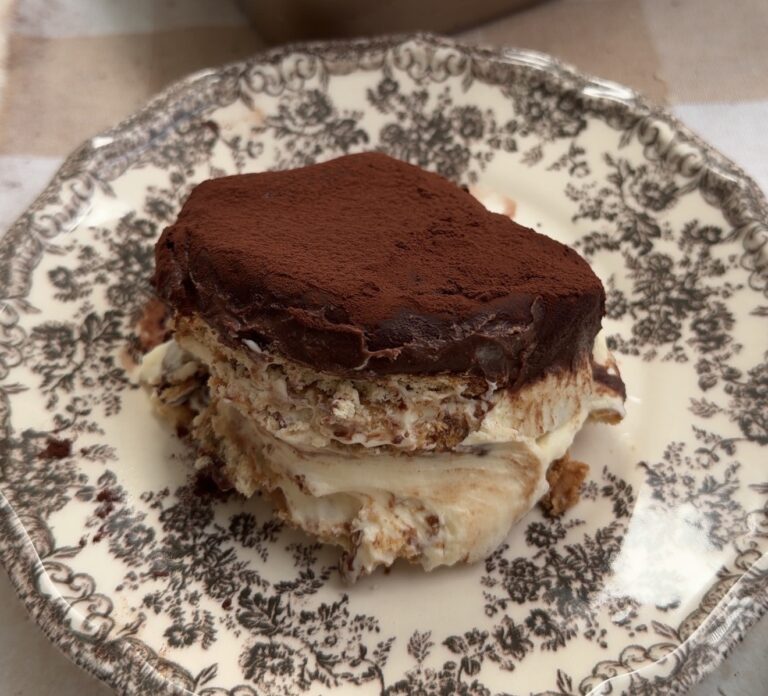
Tiramisu Ice Cream Bars with a crispy chocolate shell that are every bit as indulgent as they look. Creamy mascarpone and vanilla ice cream wrapped around a coffee soaked ladyfinger, frozen solid and dipped in a snappy semisweet chocolate coating that sets in seconds. All the flavours of a classic tiramisu in handheld, freezer ready form and genuinely one of the most impressive things you can make at home with very little effort.
Why you will love this recipe?
These tiramisu ice cream bars taste like someone took a classic tiramisu and turned it into the best ice cream bar you have ever had. The mascarpone base is rich and creamy without being heavy, the coffee soaked ladyfinger in the centre gives you that signature tiramisu flavour in every single bite, and that chocolate shell sets into a satisfying snap the moment it hits the frozen bar. They look like something from a high end gelato shop, they keep in the freezer for up to two weeks, and the whole process is far more straightforward than they appear. Make a batch once and they will become a permanent fixture in your freezer.
Expert Tips for Best Results!
- Get the chocolate temperature right – The melted chocolate should be smooth and fluid but not hot. If it is too hot it will start to melt the surface of the bar before the shell can set. Let it cool slightly after melting until it is just warm and pourable before you start dipping.
- Make sure your mascarpone is at room temperature – Cold mascarpone does not mix smoothly and you will end up with lumps in your ice cream base that are difficult to get rid of once the whipped cream is folded in. Take it out of the fridge at least an hour before you start and it will blend into the condensed milk and vanilla effortlessly.
- Never refreeze a bar that has fully thawed – If a bar has thawed completely, the texture of both the ice cream and the chocolate shell will not be the same once refrozen. The ice cream can become icy and grainy and the shell loses its snap. Only take out of the freezer what you are ready to eat immediately.
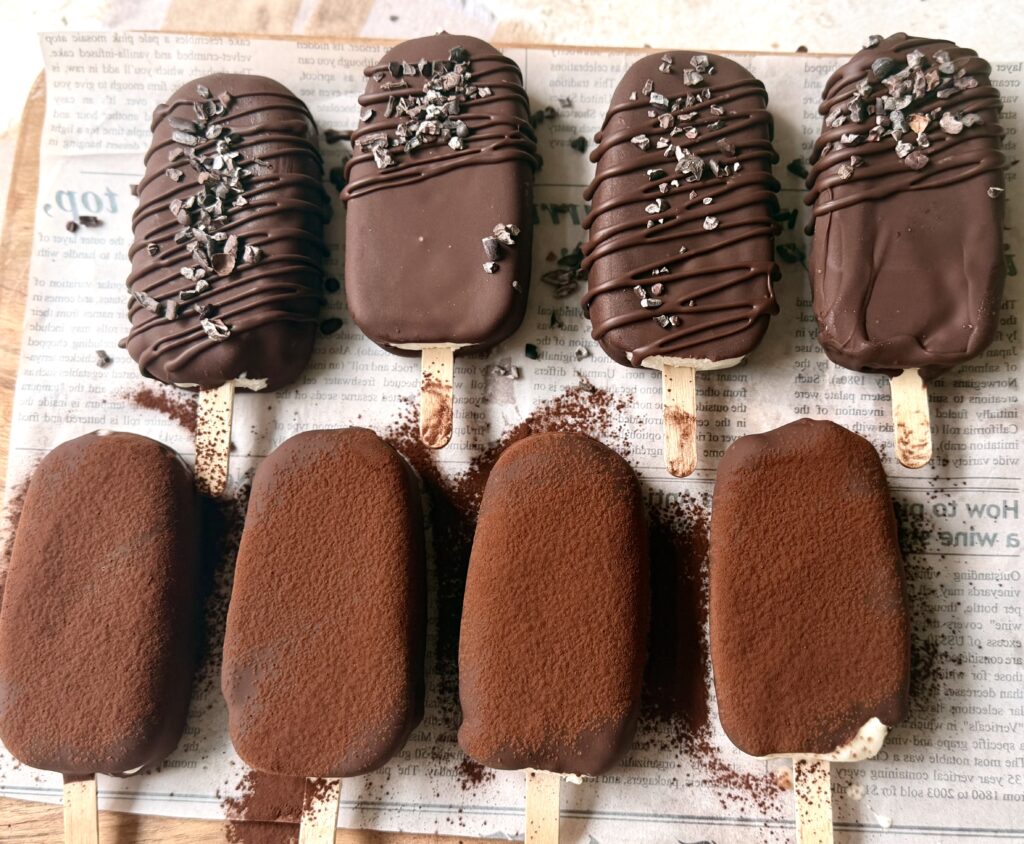
- Store the bars properly so they don’t stick together – Once frozen, store the dipped bars in an airtight container or zip lock bag with a sheet of baking paper between each one. This prevents them from sticking together and keeps the chocolate shell intact. They keep well in the freezer for up to 2 weeks and are best eaten straight from frozen for that satisfying chocolate snap.
- Return the bars to the freezer immediately after dipping – The chocolate shell sets fast against the frozen bar but melts just as quickly at room temperature. As soon as each bar is dipped and the shell has set, transfer it straight to a sheet of baking paper and get it back into the freezer without delay. Do not leave them sitting out while you work through the rest of the batch.
How to make Tiramisu Ice Cream Bars?

Step 1: Whip the cream
To start, pour the cold heavy whipping cream into a large bowl and whip until soft stiff peaks form. The cream should hold its shape when the whisk is lifted but still look smooth and light rather than stiff and grainy. Set aside while you prepare the mascarpone mixture.
Step 2: Make the mascarpone base
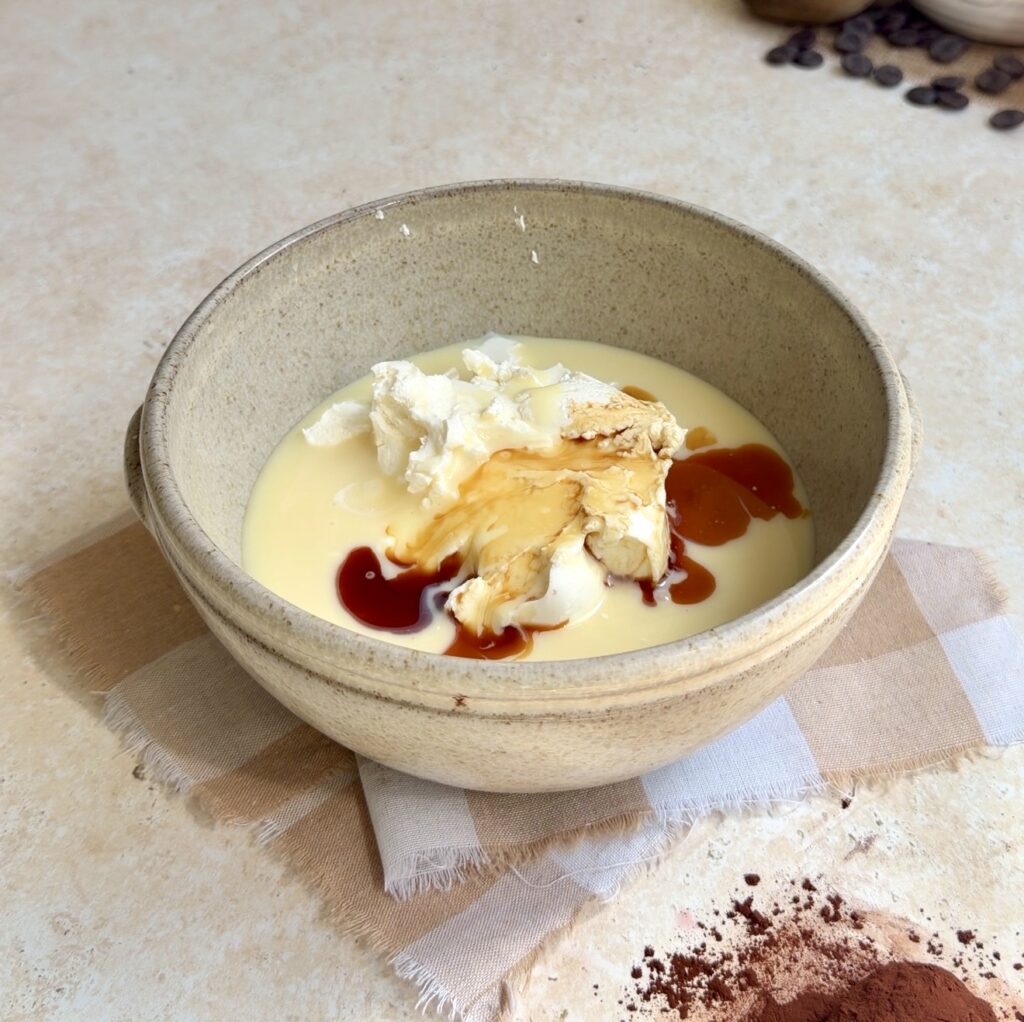
In a separate bowl, combine the room temperature mascarpone, condensed milk and vanilla extract and mix until completely smooth with no lumps remaining. Start with 100g of condensed milk, taste the mixture and add more if you prefer a sweeter base. This mascarpone mixture is what gives these tiramisu ice cream bars their rich, creamy depth of flavour.
Step 3: Fold the two mixtures together
Add the mascarpone mixture into the whipped cream and fold gently until just combined. It is important at this stage not to overmix as you want to keep as much air in the mixture as possible for a light, creamy texture rather than a dense one.
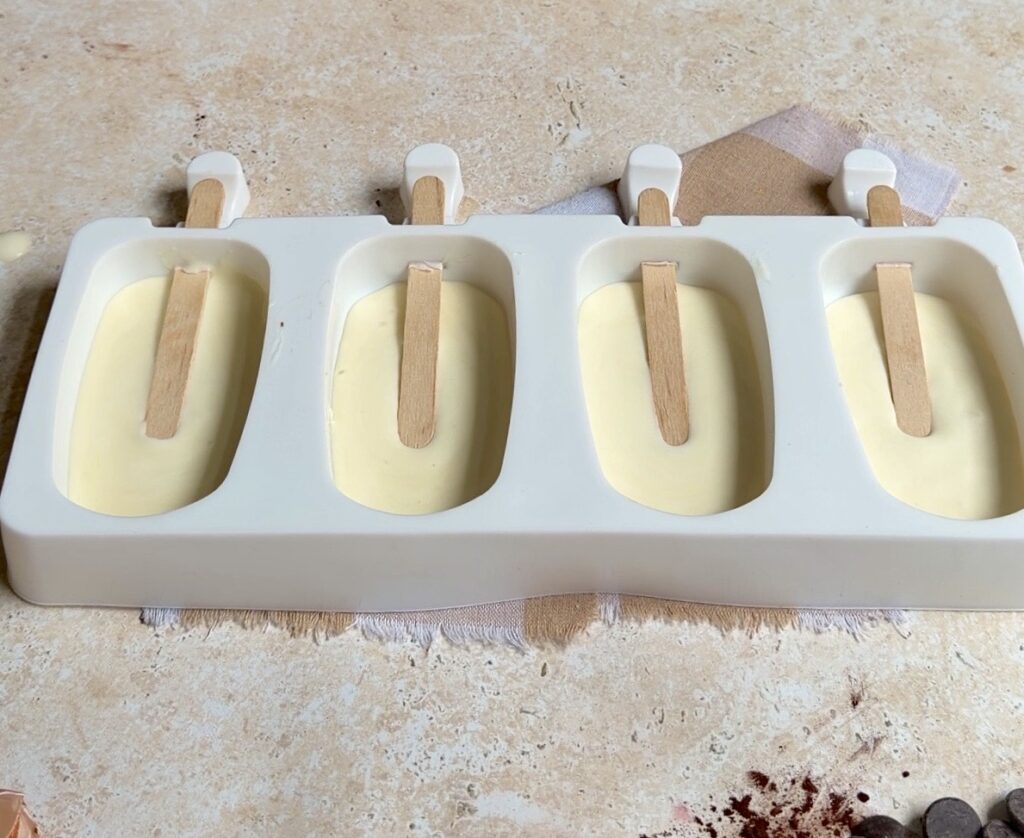
Step 4: Fill the moulds halfway
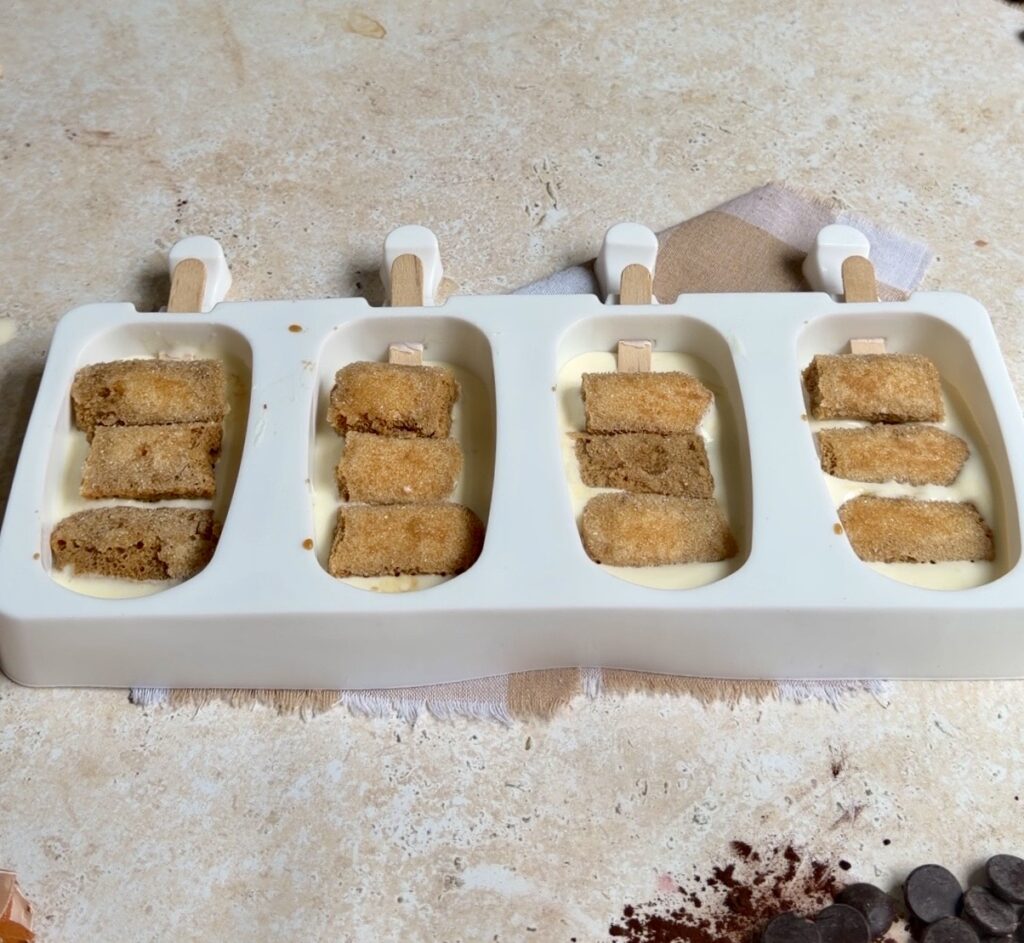
Spoon the ice cream mixture into your silicone moulds until they are roughly halfway full. Insert an ice cream stick into each mould at this stage so it is properly anchored in the mixture before the ladyfinger goes in.
Step 5: Add the coffee ladyfinger
Working quickly, dip each ladyfinger into the cooled coffee for just 1 to 2 seconds per side. You want them lightly soaked rather than saturated. Press one coffee dipped ladyfinger into each mould on top of the ice cream mixture, pressing down gently so it sits flat.
Step 6: Top up and freeze
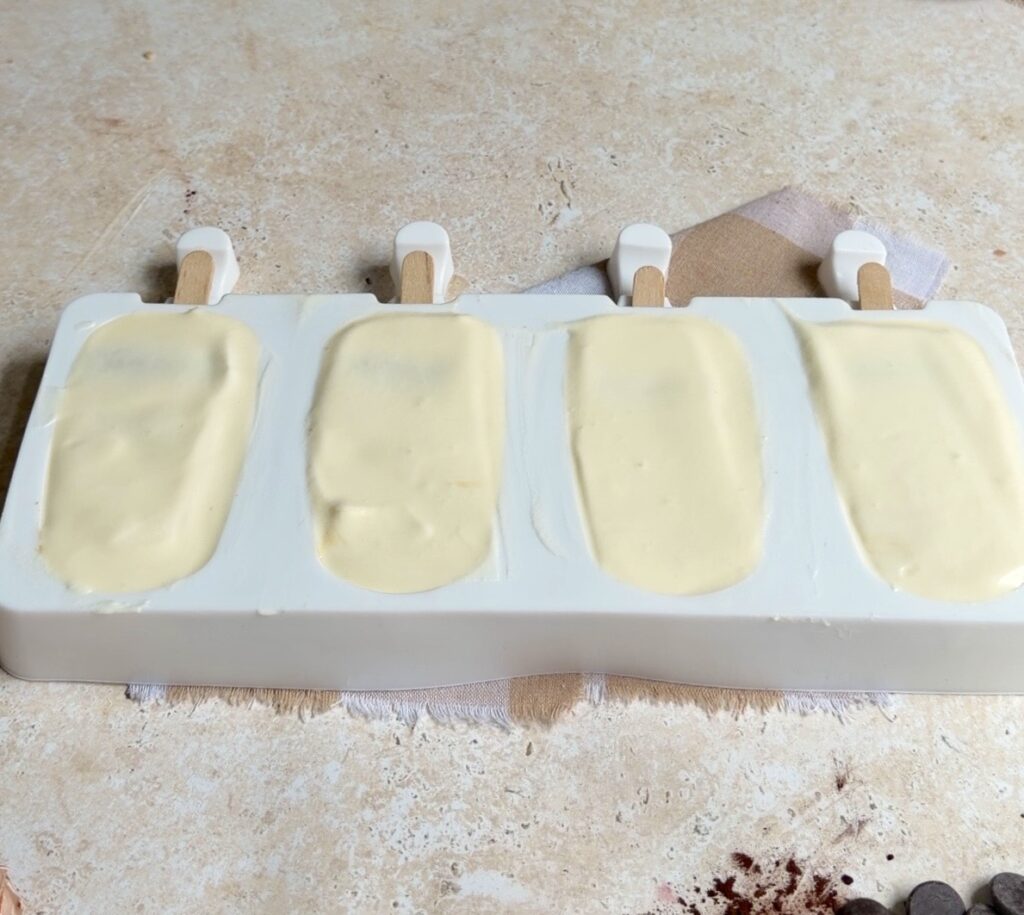
Spoon the remaining ice cream mixture on top of the ladyfingers to fill the moulds completely. Smooth the surface flat, cover with cling film and transfer to the freezer. Leave to freeze for a full 24 hours before moving on to the next step. This waiting time is essential for the bars to freeze solid enough to hold their shape during dipping.
Step 7: Make the chocolate shell
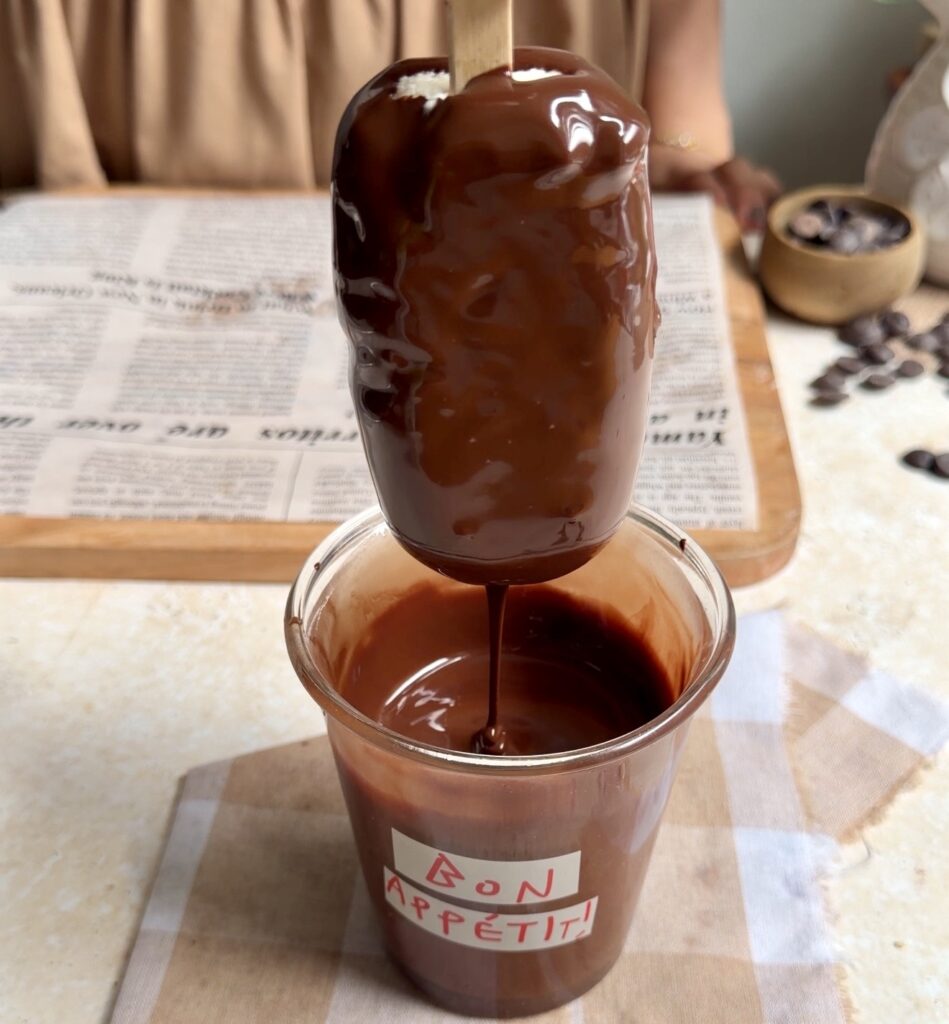
Once the bars are fully frozen, melt the finely chopped chocolate and oil together either in the microwave in 30 second bursts, stirring between each, or over a water bath stirring continuously until completely smooth. Pour the melted chocolate into a tall glass and leave to cool slightly until just warm and pourable.
Step 7: Dip and serve
Working quickly one bar at a time, pop each bar out of its mould and dip it into the chocolate. Hold it submerged for 5 to 10 seconds until the shell sets completely against the frozen surface. Transfer immediately to a sheet of baking paper. Serve straight away or return to the freezer immediately as the chocolate shell melts fast at room temperature.
Frequently Asked Questions
Can I make these without silicone moulds?
Yes. If you do not have silicone moulds, line a loaf tin or small baking dish with cling film and pour the ice cream mixture in as one large slab. Freeze solid, then cut into bars and dip in the chocolate the same way. The shape will be less uniform but the flavour and texture will be identical.
What do I do with leftover ice cream mixture and chocolate?
Both are too good to waste. Spoon any leftover ice cream mixture into an airtight container and freeze it as a simple mascarpone vanilla ice cream tub. For an extra treat, fold in a few roughly broken coffee dipped ladyfingers before freezing for a quick no churn tiramisu ice cream. For the leftover chocolate, pour it onto a sheet of baking paper, spread flat and scatter crushed nuts, flaky sea salt or sprinkles over the top before it sets. You get a simple chocolate bark that is a genuinely lovely bonus treat. Let it set fully before breaking into pieces and storing in an airtight container.
Why is my chocolate shell not snapping properly?
Most likely the chocolate was either too warm when you dipped or the oil ratio was slightly off. The oil helps the chocolate stay fluid for dipping but too much can prevent it from setting into a firm snap. Make sure the chocolate has cooled to just warm before dipping and that the bars are completely frozen solid when they go in.
Can I use a different biscuit instead of ladyfingers?
Ladyfingers are ideal because they absorb the coffee quickly and have a light texture that works well inside the bar. If you cannot find them, a plain digestive biscuit or a piece of sponge cake works as a substitute. Just keep in mind that denser biscuits will not absorb the coffee as readily so give them a slightly longer dip.
How do I store these tiramisu ice cream bars?
Once dipped, place the bars on baking paper and return them to the freezer immediately as the chocolate shell melts very quickly at room temperature. Store in an airtight container or zip lock bag in the freezer with a sheet of baking paper between each bar so they do not stick together. They keep well for up to 2 weeks. Do not refreeze a bar that has fully thawed as the texture of both the ice cream and the chocolate shell will not be the same once refrozen.
Watch How to Make it!
Press play to see this recipe step by step. And don’t forget to subscribe for more baking videos!
Recipe Card
Tiramisu Ice Cream Bars
These Tiramisu Ice Cream Bars are a creamy mascarpone and vanilla ice cream base wrapped around a coffee soaked ladyfinger, frozen solid and dipped in a crispy semisweet chocolate shell. Rich, indulgent and surprisingly simple to make at home, these are the kind of freezer treat that looks incredibly impressive and tastes even better than it looks.
Ingredients
For Ice Cream: (makes 8-9 Classic Magnums)
- 200g cold heavy whipping cream (3/4 cup)
- 100g room temperature mascarpone (1/2 cup)
- 120g condensed milk (start with 100g / 1/3 cup, and add more if needed)
- 1 1/2 tsp vanilla extract
- Ladyfinger biscuits
- 1/2 cup cooled strong brewed coffee or espresso
For Chocolate Shell:
- 250g finely chopped semisweet or milk chocolate
- 1 tbsp neutral oil or coconut oil
Instructions
- Pour the cold heavy whipping cream into a bowl and whip until soft stiff peaks form. Set aside.
- In a separate bowl, mix the room temperature mascarpone, condensed milk and vanilla extract until completely smooth. Start with 100g of condensed milk, taste and add more if needed.
- Fold the mascarpone mixture into the whipped cream gently until just combined. Do not overmix.
- Spoon the mixture into silicone moulds halfway. Insert an ice cream stick into each mould.
- Dip each ladyfinger into the cooled coffee for 1 to 2 seconds per side. Press one into each mould on top of the mixture.
- Spoon the remaining mixture on top to fill the moulds completely. Smooth the surface, cover with cling film and freeze for 24 hours.
- Melt the chocolate and oil together in the microwave in 30 second bursts or over a water bath until smooth. Pour into a tall glass and leave to cool slightly.
- Pop the bars out of the moulds one at a time and dip into the chocolate. Hold for 5 to 10 seconds until the shell sets. Transfer to baking paper and serve immediately or return to the freezer straight away.
Notes
- For Storage:
- Dip and return to the freezer immediately as the chocolate shell melts quickly at room temperature.
- Layer in an airtight container or zip lock bag with baking paper between each bar to keep them separate and the shell intact.
- Keeps well in the freezer for up to 2 weeks.
- Once fully thawed do not refreeze as both the ice cream and chocolate shell will lose their texture.
If you like Ice Cream recipes like these, you should definitely check out my:
1) Hot chocolate fudge swirl cookies and cream icecream
2) Tiramisu Ice cream
Looks amazing, is this recipe for 5 icecreams?
approx 9-10